When it comes to maintaining your pool, one of the most important aspects is ensuring that the water flow throughout your system is controlled efficiently. A PVC pool valve is a critical tool in achieving this. Whether you are regulating water flow through your filtration system, directing water to your pool heater, or isolating sections of your plumbing for maintenance, a PVC pool valve allows you to fine-tune the flow and prevent problems like poor filtration or backflow.
Installing a PVC pool valve is a relatively simple process, but it requires the right tools, knowledge, and approach to ensure everything works smoothly. In this blog, we will guide you through the process of installing a PVC pool valve for better water flow control, offering step-by-step instructions, tips, and best practices to ensure a successful installation.
Why a PVC Pool Valve Is Important for Water Flow Control
Before we dive into the installation process, it’s essential to understand why a PVC pool valve is important for your pool system. These valves allow you to control the amount of water flowing through your pool plumbing system, which affects the efficiency of your filtration system, the performance of your pool pump, and the effectiveness of your heater.
By adjusting the water flow with a PVC pool valve, you can:
- Optimize filtration: Ensuring that the correct flow rate is directed through the filter is key to maintaining clean water.
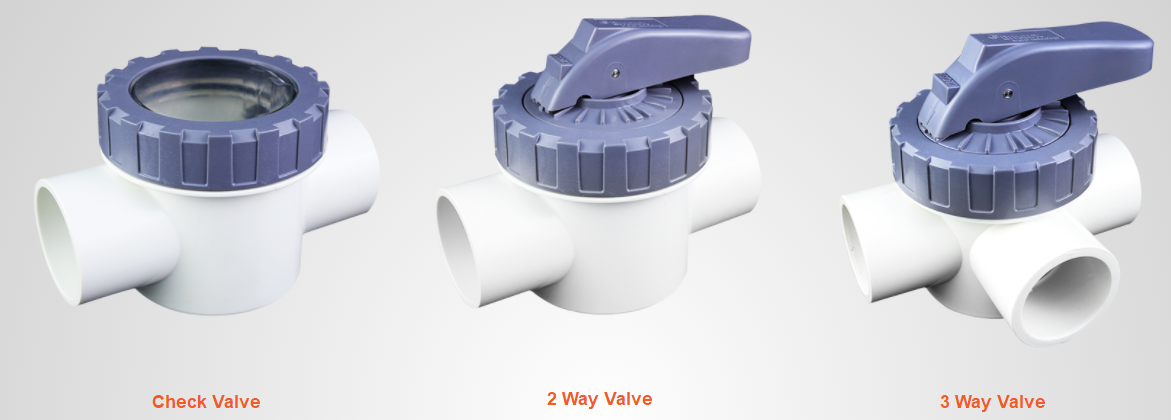
- Prevent backflow: Certain valves, like check valves, prevent water from flowing back into the pool plumbing.
- Improve pump efficiency: Controlling water flow can prevent unnecessary strain on the pump, helping it run more efficiently and reducing energy consumption.
- Direct water to specific areas: With diverter valves, you can direct water flow to features like spas, waterfalls, or additional return jets, which can help optimize your pool’s system.
Now, let’s explore how to install a PVC pool valve for better water flow control.
Tools and Materials You’ll Need
Before starting the installation, make sure you have all the necessary tools and materials on hand:
- PVC Pool Valve – Choose the appropriate type based on the function (ball valve, check valve, diverter valve, etc.) and size for your system.
- PVC Pipe Cutter or Hacksaw – To cut the pipes to the correct length.
- PVC Primer and Cement – Used to bond PVC pipes and fittings securely.
- Measuring Tape – To measure the length of PVC pipes for proper fitting.
- PVC Pipe Fittings – Including elbows, tees, and couplings, as needed to fit the new valve into your system.
- PVC Pipe Deburring Tool – To smooth out the edges of cut PVC pipes for a better seal.
- Gloves and Safety Glasses – For protection during cutting and cementing.
- Teflon Tape (optional) – For threaded connections to ensure a watertight seal.
Step-by-Step Guide to Installing a PVC Pool Valve
Step 1: Turn Off the Pool System
The first and most important step in any pool plumbing installation is to turn off the pool system. This includes the pump, filtration system, heater, and any other pool equipment that the valve will be connected to. You should also ensure the pool is not in use to avoid any water flow while you are working on the system.
Step 2: Determine the Location of the Valve
The next step is to decide where the PVC pool valve will be installed. This will depend on the type of valve you are installing and its purpose. For example, if you are installing a ball valve to regulate water flow to the filter, it will typically be installed between the pool pump and the filter. If you’re installing a check valve to prevent backflow, it will be placed in the return line after the filter.
Use a measuring tape to mark the appropriate location on the PVC pipe where you want to install the valve. You will need to cut the pipe at this point to insert the valve.
Step 3: Cut the PVC Pipe
Using a PVC pipe cutter or hacksaw, cut the PVC pipe where you marked the spot for the valve installation. Make sure the cuts are straight and clean, as this will help ensure a tight seal when connecting the valve. After cutting the pipe, use a deburring tool to smooth out the edges of the cut pipes to avoid any damage to the pipe fittings and ensure a clean connection.
Step 4: Dry Fit the Valve and Pipes
Before you begin applying PVC cement, it’s essential to dry fit the valve and pipes. Place the valve between the two sections of PVC pipe to make sure it fits correctly and aligns with your system. This step ensures that everything is in place and gives you a chance to make adjustments if necessary.
At this point, you should also check the direction of the valve if it’s a one-way valve, such as a check valve. Most PVC pool valves will have arrows on the valve body to indicate the correct flow direction, so ensure that the valve is installed in the right orientation.
Step 5: Apply PVC Primer and Cement
Once you’re satisfied with the dry fit, it’s time to use the PVC primer and cement. Start by applying a coat of PVC primer to the outside of the pipe ends and the inside of the valve connections. The primer prepares the surface for bonding by softening the PVC, ensuring a better seal.
After applying the primer, immediately apply PVC cement to both the primed surfaces. Be sure to apply a generous amount of cement to ensure a strong, watertight bond. Quickly insert the valve into place and hold it for a few seconds to ensure it’s securely connected. Be careful not to rotate the valve after it’s been set, as the cement can set rapidly.
Step 6: Secure and Allow the Cement to Dry
After applying the cement, hold the valve in place for several seconds to allow the bond to form. Then, let the valve and pipe connections dry for at least 15-20 minutes. Follow the manufacturer’s instructions on the cement can for recommended curing times, as this can vary depending on the type of PVC cement used.
During this time, do not disturb the connection to avoid damaging the bond. Once the cement has dried and cured, the connection should be strong and watertight.
Step 7: Reconnect the Pool System and Test for Leaks
Once the PVC pool valve is securely in place and the cement has dried, reconnect your pool system. Turn the system back on and check for any signs of leaks around the valve connection. If there are no leaks, you’ve successfully installed the valve.
If you do notice any leaks, turn the system off immediately and inspect the connections. It may be necessary to reapply cement or adjust the fitting to achieve a proper seal.
Step 8: Test the Water Flow
Finally, test the water flow through the valve. For a ball valve, ensure that you can easily turn the handle to adjust the flow. If the valve is a check valve, verify that it is preventing backflow and that water is flowing in the correct direction. Make sure everything is functioning as expected.
Tips for Installing PVC Pool Valves
- Measure Twice, Cut Once: Before cutting any pipes, double-check your measurements to ensure that the valve fits perfectly in your system.
- Use Quality Cement: Always use high-quality PVC primer and cement to ensure a strong bond that won’t leak over time.
- Wear Protective Gear: Use gloves and safety glasses when cutting PVC pipes and applying cement to protect yourself from flying debris and chemicals.
- Allow Adequate Drying Time: Be sure to follow the manufacturer’s guidelines for curing time to ensure the valve is properly bonded.
Conclusion
Installing a PVC pool valve is a straightforward process that can significantly improve your pool’s water flow control. Whether you’re regulating water flow to your filter, preventing backflow, or isolating parts of the system for maintenance, a PVC pool valve provides an efficient and effective way to manage your pool plumbing.
By following the step-by-step instructions provided above and using the right tools and materials, you can install a PVC pool valve with confidence. Not only will this installation help optimize your pool’s performance, but it will also enhance the longevity of your pool equipment and reduce maintenance costs in the long run.
A properly installed PVC pool valve is an essential part of any pool system, and mastering the installation process ensures that your pool runs efficiently for years to come.


Leave a Reply